 Figure 7
 – Setting the node parameters involves setting a priority for
the machine, which is a unique ID you select. The lower the number
the higher the priority – this machine acts as the master host.
Click finish and now we have one node in our cluster.
Actually, not quite so fast. Be patient, this process isn’t instant. When you click finish the NLB manager actually goes out and configures your network adapter for you. It creates a new IP address in your network connections, enables the Network Load Balancing service on your network adapter(s) you chose during setup and configures the setting we assigned on the NLB property sheet.
You’ll see your network connection flash on and off a few times during this configuration process on the machine you are configuring to be a host. This is normal, but be patient until you see your network connection back up and running.
If all goes well you should see your network connection back up and running and see a new node in the NLB Manager sitting below the cluster (see Figure 8 which shows both nodes). If everything is OK the Status should say Converged. If it does node 1 is ready.
But we’re not quite done yet – we still need to add the second node. To do so right-click on the cluster, after which you go through the steps shown in Figure 7 and 8 one more time. Again be patient, this process is not super fast – it takes about 20 seconds or so to get a response back from a remote machine. Once you click finish the process of Converging can take a minute or more.
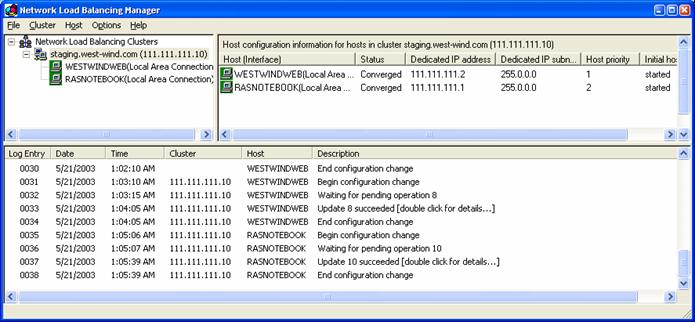 Figure 8
 – The final cluster with both nodes converged and ready to process requests.
Troubleshooting Tips
I’ve had a few problems getting convergence to happen for the first time. It helps to follow the steps here closely from start to finish and if for whatever reason you end up removing nodes make sure you double check your network settings first before re-adding nodes.
You can check what NLB did in the Network Connections for your machine (Figure 9). Click on the Load Balancing section to see the settings made there. Remember that the settings should match between machines with the exception of IP Addresses assigned for each machine. You should also see the new IP address added in the Internet Protocol settings’ Advanced page.
 Figure 9
 – All of the setting that NLB makes are made
to the network adapter that the virtual IP is bound to.
You can click on the Network Load Balancing item to
configure the node settings as described earlier. The Virtual
IP also has been added in the Internet Protocol | Advanced
dialog.
If things look Ok, make sure that the machines can ping each other with their dedicated IPs. Figure 10 shows what you should see for one of the machines and you should run this test on both of them:
 Figure 10
 – Checking whether the machines can see each other.
Use IPCONFIG to see adapter information and you should see both your physical adapter and the virtual IP configured. Make sure that you don’t get any errors that say that there’s a network IP address conflict. If you do it means that the virtual IP is not virtual – ie. It’s entered but it’s not bound to the NLB service. In that case remove the IP and then configure the NLB first, then re-add the IP address. Alternately remove everything then try adding it one more time through the NLB manager.
I’ve also found that it helps to configure remote machines first, then configure the machine running the NLB Manager (if you are using it in the cluster) last. This avoids network issues on the manager machine – plain network access gets a little weird once you have NLB configured on a machine. Again this is a great reason to use two adapters rather than one.
Putting it all together
Ok, so now we’re ready to try it out. For kicks I ran two simple tests using the Application Center Test tool that comes with VS.Net Enterprise Architects on my two machines: My office server (P4 2.2ghz) and my Dell Laptop (also P4 2.2ghz).
For the first test I used only a single ASP.Net page that reads some data from a local SQL Server using a business object. Both machines have SQL Server installed locally and for this first test both are using their own local data from it. I did this to test and see them run individually under load, and then together with Load Balancing to compare the results. This is a contrived example for sure, but it shows nicely what load balancing is capable of doing for you in a best case scenario. Figure 10 shows the output for a short query running both machines with Load Balancing