Beşiktaş Forum  ( 1903 - 2013 ) Taraftarın Sesi


Geri git   Beşiktaş Forum ( 1903 - 2013 ) Taraftarın Sesi > Taraftar > Gündem Dışı > Teknoloji

Teknoloji Bu Bölümde Uydu vb. teknolojik gelişimler izlenir.

Cevapla
 
LinkBack Seçenekler Stil
Alt 11-12-2006, 08:34   #1
B J K
 
odin - ait Kullanıcı Resmi (Avatar)
 
Thumbs up Exchange Server larınızın Üzerindeki İş Yükünü Paylaştırın (Network Load Balancing)

When a single Web Server machine isn’t enough to handle the traffic on your Web site it’s time to look into building a Web Farm that uses multiple machines on the network acting as a single server. In this article Rick looks at the Windows Load Balancing Service and the new interface it sports in Windows Server 2003, which makes creating a Web Farm quick and easy and – gasp –even an affordable solution.

With the release of Windows Server 2003 Network Load Balancing has become a much more visible tool as a part of the operating system, providing a very usable and relatively easy to configure interface that makes it easy to build a Web Farm. The Network Load Balancing Service has been around in one incarnation or another since Windows NT SP4, but Windows Server 2003 is the first operating system that brings this service into the forefront as a main component of the OS. A new Network Load Balancing Manager application is now directly available from the Adminstrative Tasks menu and it’s powerful enough to allow to configure the entire cluster from a single console. The service is now available for all products in the Windows Server family including the lower end Web Edition which means that you now have a much more affordable solution to create Web Farms at your disposal. Just add servers please.

In this article I’ll review the basics of a Load Balancing service and then show you how to set up configure a basic installation using two machines.
Web Farms for city folk – do you need it?

A Web Farm is a not so fancy term for a collection of servers that act as a single Web server. The process behind the scenes maps a ‘virtual’ IP address to multiple machines. Software such as the Network Load Balancing Service or hardware like a specialized router or Load Balancer then deals with dishing up requests to the appropriate machine in the server pool.

Web Farms are an obvious choice if you’ve hit the limits of your single machine hardware. But before jumping on the Web Farm band wagon (or is that a tractor?) you should look closely at your hardware and application and be sure that you can’t make it all run on a single machine first. Although the process of creating a Web Farm isn’t difficult, administration of two or more servers and keeping them properly synched is actually a lot more work than administering a single server.

Upgrading your hardware is certainly one option available to you. Today’s hardware is incredibly capable and should be sufficient to handle all but the most demanding Web applications on a single box. Multiprocessor machines with up to 16 processors on Windows make a pretty powerful platform to run Web applications with, even if those high end machines are rather pricey. While the Yahoo’s and Amazon’s won’t run on a single box (or on Windows for that matter), a vast majority of applications are likely to be able to comfortably serve millions of transactional hits a day from a single machine even with a single processor.

But Load Balancing can also provide benefits in the overload scenario. For one, it’s generally cheaper to throw mid-level machines at a load problem rather than buying one top of the line high end machine. Even with server licenses involved multiple low end machines might provide a more cost efficient solution.

Load Balancing also provides something else that has nothing to do with scalability: The ability to have failover support if something goes wrong on one of the servers in the pool. Because a Web Farm are made up of essentially identically configured servers, a failure on a single server will not bring down the entire Web site. Other servers in the pool can continue to process requests and pick up the slack. For many companies this feature of load balancing is often important for peace of mind both in the knowledge that a single point of failure on the Web Server is avoided as well as providing an in place mechanism to grow the application should the need arise at a later point.
How does it work?

The concept behind Network Load Balancing is pretty simple: Each server in a Load Balancing Cluster is configured with a 'virtual' IP address. This IP address is configured on all the servers that are participating in the load balancing 'cluster' (a loose term that's unrelated to the Microsoft Cluster Service). Whenever a request is made on this virtual IP a network driver on each of these machines intercepts the request for the IP address and re-routes the request to one of the machines in the Load Balancing Cluster based on rules that you can configure for each of the servers in the cluster. Microsoft this process Network Load Balancing (NLB). Figure 1 shows how the process works graphically.
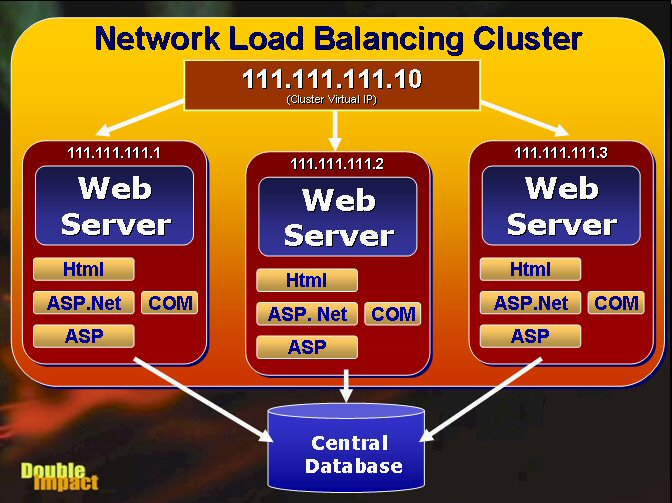
Click the image to open in full size.
Figure 1A network load balancing cluster routes requests to a single virtual IP to available servers in the load balancing cluster. Note that each machine is self-sufficient and runs independent of the others duplicating all of the resources on each server. The database sits on a separate box(es) accessible by all servers.

Although a Web Farm is a common scenario for this service keep in mind that any IP based service can be run off this service. For example, you could use a mail server that is under heavy load and uses a central datastore to share multiple machines in a cluster.

Network Load Balancing facilitates the process of creating a Web Server Farm. A Web Server farm is a redundant cluster of several Web servers serving a single IP address. The most common scenario is that each of the servers is identically configured running the Web server and whatever local Web applications running on the Web server as shown in Figure 1. Each machine has its own copy of everything it needs to run the Web application which includes the HTML files, any script pages (ASP, ASP.Net), any binary files (such as compiled .Net assemblies, COM objects or DLLs loaded from the Web app) and any support files such as configuration and local data files (if any). In short the application should be fully self-contained on a single machine, except for the data which is shared in a central location. Data typically resides in a SQL backend of some sort somewhere on the network, but could also be files shared in a directory for files from a file based database engine such as Visual FoxPro or Access.

Each server in the cluster is fully self-contained, which means it should be able to function without any other in the cluster with the exception of the database (which is not part of the NLB cluster). This means each server must be configured separately and run the Web server as well as any Web server applications that are running. If you're running a static site, all HTML files and images must be replicated across servers. If you’re using ASP or ASP.Net, those ASP pages and all associated binaries and support files must also be replicated. Source control programs like Visual SourceSafe can make this process relatively painless by allowing you to deploy updated files of a project (in Visual Studio.Net or FrontPage for example) to multiple locations simultaneously.

Short of the data everything else is running on all of the machines in the NLB cluster. The key is redundancy in addition to load balancing – if any machine in the cluster goes down, NLB will re-balance the incoming requests to the still running servers in the cluster. The servers in the cluster need to be able to communicate with each other to exchange information about their current processor and network load and even more basic checks to see if a server went down.

If you have COM components as part of your Web application things get more complicated, since the COM objects must be installed and configured on each of the servers. This isn't as simple as copying the file, but also requires re-registering the components, plus potentially moving any additional support files (DLLs, configuration files if needed, non-sql data files etc.). In addition, if you're using In-Process components you'll have to shut down the Web server to unload the components. You'll likely want to set up some scripts or batch files to perform these tasks in an automated fashion pulling update files from a central deployment server. You can use the Windows Scripting Host (.vbs or .js files) along with the IIS Admin objects to automate much of this process. This is often tricky and can be a major job especially if you have a large number of cluster nodes and updates are frequent – strict operational rules are often required to make this process reliable. Luckily if you’re building applications with pure ASP.Net you won’t have these issues since ASP.Net can update .Net binary files without any shutdowns by detecting changes to the source files and shadow copying binary files to a different directory for execution.

Make sure you cover your database!

Since multiple redundant machines are involved in a cluster you'll want to have your data in a central location that can be accessed from all the cluster machines. It's likely that you will use a full client/server database like SQL Server in a Web farm environment, but you can also use file based data access like Visual FoxPro or Jet (Access) tables if those tables are kept in a central location accessed over a LAN connection.

In heavy load balancing scenarios running a SQL backend, it’s important to understand that the database not your application code can easily become your bottleneck! Without going into details here, you need to think about what happens when you overload the database, which is essentially running on a single box. Max out that box and you have problems that are much harder to address than Web load balancing I am going to describe here. At that point you need to think about splitting your databases so that some data can potentially be written to other machines. For redundancy you can use the Microsoft Cluster Service to provide the ability to monitor and sync a backup system that can take over in case of failure of the primary server.

It’s possible that the database can become your weakest link so if you’re after redundancy, make sure you also have a backup plan for your database. If you’re using SQL Server you might want to use Replication to create live shadows on a backup box for example. At the very least make sure that frequent automated backup are performed especially if you’re not using a SQL backend and running file based data engines like FoxPro or Jet.

Efficiciency

Network Load Balancing is very efficient and can provide you reasonably close to 1:1 performance improvement for each machine added into the cluster – there is some overhead involved, but I didn't notice much in my performance tests with Vs.Net Application Center Test Tool with each machine adding 90-95% of its standalone performance to the cluster even in my non-optimized network setup that I was using to conduct the tests.

You may notice that with this level of redundancy increasing your load balancing capability becomes simply a matter of adding additional machines to the cluster, which gives you practically unlimited application scalability (database allowing) if you need it.
Setting up NLB

In order to utilize the Windows Server Network Load Balancing features you will need two machines running Windows Server 2003. Each machine needs to have at least one network card and at least one fixed IP address. Although running with one adapter works well, for best performance it’s recommended that you have two adapters in each machine – one mapped to the real IP Address (Microsoft calls this the Dedicated IP) and one mapped to the ‘virtual’ IP Address (Microsoft calls this the Cluster IP). Be aware that NLB uses some advanced networking features of network adapters, so it’s possible that some low end adapters (especially those for non-server machines) may not support the required NDIS protocols.

In addition you will also need one more machine for testing (3 machines total). The test machine should be external as you can’t use a machine from the pool to test – it will only fire request on the local machine since the IP requests are not traveling over the network when you hit the virtual IP address – it goes to the local machine.

I'm going to use two ‘servers’ here to demonstrate how to set up and run NLB. Assume the IP addresses for these machines are 111.111.111.1 and 111.111.111.2. To create a virtual IP address (Cluster IP) you need to pick an available IP Address on the same Class C network segment. In my example here I’ll use 111.111.111.10.

Unlike previous versions of NLB the new version has a central manager application that you can use to create a cluster from a single machine. Gone are the hassles of having to manually configure each machine manually – you can do it all from a single machine over the network which is a welcome change.

To start setting up this cluster bring up the Network Load Balancing Manager from the Administrative Tools menu. Figure 1 shows what the cluster manager looks like.

Click the image to open in full size.
Figure 1 – To set up a new NLB cluster bring up the Network Load Balancing Manager and right click to createa a new cluster.

Right-click on the root node to add a new cluster. Next configure the basic cluster configuration, which will consist of assigning the Cluster or virtual IP address. Figure 2 shows what this dialog looks like filled out for our test network.

Click the image to open in full size.
Figure 2 – Configuring the Cluster IP. This is the ‘virtual’ IP address
that will service all servers in the cluster. Note that you should set the
operation mode to Multicast if you are using a single adapter.

The IP Address is the virtual IP address for the cluster that will be used to address this cluster. NLB will actually create a new IP address on each machine in the cluster and bind it to the specified network adapter (in the next step). Choose a subnet mask – make sure you use the same one for all servers in the cluster. The Full Internet name is only for reference and is used here primarily for displaying the name of the server. But if you have a domain configured for the server you should use that domain name.

Cluster operation mode is very important. Unicast mode means that NLB takes over the network card it is bound to and doesn’t allow any additional network traffic through it. This is the reason why two adapters are a good idea – one that NLB can take over and one that can still handle all other network traffic directed at the dedicated IP address of the server. If you’re using a single adapter you should probably select Multicast which allows both the NLB traffic and the native IP traffic to move through the same network adapter. Multicast is slower than Unicast as both kinds of traffic need to be handled by the network adapter but it’s the only way to remotely configure all machines centrally. You can run a single adapter in Unicast mode, but the cluster manager will not be able to communicate with the server after it’s configured. As a general rule use Unicast for two adapters, Multicast for a single adapter. With my network cards I had to use IGMP mode in order to get the cards to converge properly – you may have to experiment with both modes to see what works best for you.

Leave the Allow Remote Control option unchecked. This allows you to reconfigure the nodes and port rules remotely, although I found little need to do so. Any changes made to the cluster are automatically propagated down to the nodes anyway, so there’s little need to do this with the exception of changing the processing priority. If you do want this functionality I suggest you enable it after you have the cluster up and running.

The next dialog called Cluster IP Addresses allows you to add additional virtual IP addresses. This might be useful if you have a Web server that is hosting multiple Web sites each of which is tied to a specific IP address. For our example here, we don’t need any and can just click next as shown in Figure 3.


Click the image to open in full size.
Figure 3 – If you need to add additional IP addresses to be load balanced
you can add them here. This is needed only if you host multiple sites
on separate IP addresses and you need separate IPs for these.

Next we need to configure port rules. Port rules determine which TCP/IP port is handled and how. Figure 3 shows the Port Rules dialog with two port rules defined for Port 80 (http) and 443 (SSL). The default port configuration set up by NLB handles all ports, but in this case that rule is too broad. Port rules can’t overlap so if you create specific rules you either have to create them for each port specifically or create ranges that fit your specific ports.
Click the image to open in full size.
Figure 4 – The Port Rules dialog shows all of the port rules defined for
cluster. By default a rule for all ports – 0 – 65365 is defined. Here I’ve
Created to specific port rules for port 80 and 443.

To add a new port rule click on the Add button which brings up the dialog shown in Figure 5. Here you can configure how the specific port is handled. The key property is the Filtering Mode which determines the affinity of requests. Affinity refers to how requests are routed to a specific server. None means any server can service the incoming request. Single means that a specific server has to handle every request from a given IP address. Generally None is the preferred mode as it scales better in stateless applications. There’s less overhead in NLB as it doesn’t have to route requests in many cases. Single mode is useful for server connections that do require state, such as SSL connections for HTTPS. Secure Server Certificates performs much better with a persistant connection rather than having to create new connections on each of the servers in the pool for requests. Figure 1 shows the configuration for the standard Web Server port - port 80.
Click the image to open in full size.
Figure 5 – Setting port rules lets you configure how the cluster
responds to client requests. Affinity in particular determines
whether the same server must handle all requests from
a specific IP address (single) or Class C IP address range (Class C).


To set up the second rule for the SSL Port I added another rule and then changed the port to 443 and changed the affinity to single.

Although you can’t do it from here, another important setting is the priority for each machine for each port rule. You can set up Machine 1 to take 80% of the traffic and the second 20% for example. Each rule can be individually configured. We’ll see a little later why this is important for our SSL scenario.

The rules set in this dialog are propagated to all the cluster servers, which is significant, because the cluster port rules must be configured identically on each of the cluster node servers. The configuration tool manages this by remotely pushing the settings to each of the cluster nodes Network Connections IP configuration settings. This is a big improvement over previous versions where you manually had to make sure each machine’s port rules matched and stayed matching.

Up to this point we have configured the cluster and the common parameters for each node. Now we need to add individual nodes to the cluster. Figure 6 shows the dialog that handles this step for the first node as part of the configuration process.

Click the image to open in full size.
Figure 6 – Adding a node by selecting the IP address and picking a specifc
network adapter.

When you click Next you get to another dialog that lets you configure the cluster node. The main feature to configure on this dialog is the Priority which is a unique ID that identifies each node in the cluster. Each node must have a unique ID and the lower the number the higher the priority. Node 1 is the master which means that it typically receives requests and acts as the routing manager although when load is high other machines will take over.

Konu odin tarafından (23-01-2007 Saat 14:56 ) değiştirilmiştir..
odin Ofline   Alıntı ile Cevapla
Alt 11-12-2006, 21:49   #2
Yardımcı Admin
 
Meric - ait Kullanıcı Resmi (Avatar)
 

teşekkürler abi
__________________


http://img81.imageshack.us/img81/9771/topmain8dd3mg5.jpg
Meric Ofline   Alıntı ile Cevapla
Alt 22-01-2007, 21:27   #3
 
emreaydin - ait Kullanıcı Resmi (Avatar)
 

Merhaba,

Bu makalenin burda yayinlanmasi icin kim nereden izin aldi. Gerekli bilgiyi verirseniz sevinirim!

Emre AYDIN
MSHowto.org - Yönetici
__________________
Konu Açarken Lütfen Kontrol ediniz.
emreaydin Ofline   Alıntı ile Cevapla
Alt 23-01-2007, 13:06   #4
B J K
 
odin - ait Kullanıcı Resmi (Avatar)
 

Alıntı:
emreaydin´isimli üyeden Alıntı Mesajı göster
Merhaba,

Bu makalenin burda yayinlanmasi icin kim nereden izin aldi. Gerekli bilgiyi verirseniz sevinirim!

Emre AYDIN
MSHowto.org - Yönetici

Merhaba,
Bu makele yaklaşık benim bildigim 10-15 forumda var. zaten makalaler genellikle insanlar bilgilensin diye yazılır. bu yazdıgınız makaleden resim linkleriden dolayı kaldırılmasını istiyorsanız kaldırrız kendimiz ekleriz. alinti yazisini da simdi ekliyorum.

Konu odin tarafından (23-01-2007 Saat 13:49 ) değiştirilmiştir..
odin Ofline   Alıntı ile Cevapla
Alt 23-01-2007, 14:56   #5
B J K
 
odin - ait Kullanıcı Resmi (Avatar)
 

Click the image to open in full size.
Figure 7 – Setting the node parameters involves setting a priority for
the machine, which is a unique ID you select. The lower the number
the higher the priority – this machine acts as the master host.

Click finish and now we have one node in our cluster.

Actually, not quite so fast. Be patient, this process isn’t instant. When you click finish the NLB manager actually goes out and configures your network adapter for you. It creates a new IP address in your network connections, enables the Network Load Balancing service on your network adapter(s) you chose during setup and configures the setting we assigned on the NLB property sheet.

You’ll see your network connection flash on and off a few times during this configuration process on the machine you are configuring to be a host. This is normal, but be patient until you see your network connection back up and running.

If all goes well you should see your network connection back up and running and see a new node in the NLB Manager sitting below the cluster (see Figure 8 which shows both nodes). If everything is OK the Status should say Converged. If it does node 1 is ready.

But we’re not quite done yet – we still need to add the second node. To do so right-click on the cluster, after which you go through the steps shown in Figure 7 and 8 one more time. Again be patient, this process is not super fast – it takes about 20 seconds or so to get a response back from a remote machine. Once you click finish the process of Converging can take a minute or more.

Click the image to open in full size.
Figure 8 – The final cluster with both nodes converged and ready to process requests.

Troubleshooting Tips

I’ve had a few problems getting convergence to happen for the first time. It helps to follow the steps here closely from start to finish and if for whatever reason you end up removing nodes make sure you double check your network settings first before re-adding nodes.

You can check what NLB did in the Network Connections for your machine (Figure 9). Click on the Load Balancing section to see the settings made there. Remember that the settings should match between machines with the exception of IP Addresses assigned for each machine. You should also see the new IP address added in the Internet Protocol settings’ Advanced page.

Click the image to open in full size.
Figure 9 – All of the setting that NLB makes are made
to the network adapter that the virtual IP is bound to.
You can click on the Network Load Balancing item to
configure the node settings as described earlier. The Virtual
IP also has been added in the Internet Protocol | Advanced
dialog.

If things look Ok, make sure that the machines can ping each other with their dedicated IPs. Figure 10 shows what you should see for one of the machines and you should run this test on both of them:

Click the image to open in full size.
Figure 10 – Checking whether the machines can see each other.


Use IPCONFIG to see adapter information and you should see both your physical adapter and the virtual IP configured. Make sure that you don’t get any errors that say that there’s a network IP address conflict. If you do it means that the virtual IP is not virtual – ie. It’s entered but it’s not bound to the NLB service. In that case remove the IP and then configure the NLB first, then re-add the IP address. Alternately remove everything then try adding it one more time through the NLB manager.

I’ve also found that it helps to configure remote machines first, then configure the machine running the NLB Manager (if you are using it in the cluster) last. This avoids network issues on the manager machine – plain network access gets a little weird once you have NLB configured on a machine. Again this is a great reason to use two adapters rather than one.
Putting it all together

Ok, so now we’re ready to try it out. For kicks I ran two simple tests using the Application Center Test tool that comes with VS.Net Enterprise Architects on my two machines: My office server (P4 2.2ghz) and my Dell Laptop (also P4 2.2ghz).

For the first test I used only a single ASP.Net page that reads some data from a local SQL Server using a business object. Both machines have SQL Server installed locally and for this first test both are using their own local data from it. I did this to test and see them run individually under load, and then together with Load Balancing to compare the results. This is a contrived example for sure, but it shows nicely what load balancing is capable of doing for you in a best case scenario. Figure 10 shows the output for a short query running both machines with Load Balancing
odin Ofline   Alıntı ile Cevapla
Alt 23-01-2007, 14:57   #6
B J K
 
odin - ait Kullanıcı Resmi (Avatar)
 

Click the image to open in full size.
Figure 11 – Using Application Center Test to stress test a simple page. The result here is from
combined machines – which running around 275 rps. Machine 1 and 2 individually were running 136 and 158 rps respectively.

The script hits only the ASPX page – no images or other static content was hit. I tested each of the machines individually changing the IP Addresses to their dedicated IPs in the ACT script first and then together by changing the script to use the virtual IP. The results for this short 5 minute test are as follows:
Web Store Single Read Page Test
Test Mode
Requests per second
Office Server 111.111.111.2
162
Laptop 111.111.111.1
141
Both of them Load Balanced 111.111.111.10
276

This is a ratio of 91% for the load balanced vs. the machines individually which is excellent given that we are running with a single adapter here.

The second test is a bit more realistic in that it runs through the entire Web Store application site and uses a shared SQL Server on a third machine.

Web Store Full Order Test
Test Mode
Requests per second
Office Server 111.111.111.2
91
Laptop 111.111.111.1
85
Both of them Load Balanced 111.111.111.10
135


Here the ratio is a bit worse: 77%, but the reason for this drop off has little to do with the Load Balancing, but the fact that there are some limits being hit on the SQL Server. Looking at the lock count with performance monitor reveals that the site is hitting the SQL box pretty heavily and the locking thresholds are causing requests to start slowing down significantly.

This application is not heavily SQL optimized and performance could be improved to make these numbers higher both for individual and combined tests. However, this test shows that load balancing can help performance of an app, but that there may still be other limits that can slow down the application as a whole. In short, beware of load issues beyond the Web front ends that can bite you in terms of performance. Still even in this test where an external limit was being approached we still got a significant gain from using Load Balancing.
Port Rules revisited: SSL

Remember I configured my server for HTTPS operation by configuring port 443 earlier? Actually only one of the servers has the certificate installed, so I need to manage the port rules to drive all HTTPS traffic to the SSL enabled server. This must be administered manually through the Network Connections dialog by clicking on the Load Balancing Service and then configuring the Port Rules. Notice that this dialog shown in Figure 12 has a Load Weight option, which is set to 100 in the SSL enabled server and 0 in the other.

Click the image to open in full size.
Figure 12 – When editing the Port Rules in Network Connections
you can configure the load weight for each server in percentages.

This effectively drives all SSL traffic to the machine that has the certificate installed.
Load Balancing and your Web applications

Running an application on more than one machine introduces potential challenges into the design and layout of the application. If you're Web app is not 100% stateless you will run into potential problems with resources required on specific machines. You'll want to think about this as you design your Web applications rather than retrofitting at the last minute.

If you're using Active Server Pages, you'll have to know that ASP's useful Session and Application objects will not work across multiple machines. This means you either have to run the cluster with Single Affinity to keep clients coming back to the same machine, or you have to come up with a different session management scheme that stores session data in a more central data store such as a database.

Thankfully ASP.Net has several ways around this problem by providing different options for storing Session state using either a separate State Service that can be accessed across machines or by using Session state stored in a SQL Server database. You should always use session state in one of these mechanisms because these mechanisms can survive Web application restarts which can happen more frequently in ASP.Net due to changes in web.config or simply from the Web Server (IIS 6) recycling an Application Pool.

Finally, load balancing can allow you to scale applications with multiple machines relatively easily. To add more load handling capabilities just add more machines. But remember that when you build applications this way that your weakest link can bring down the entire load balancing scheme. If your SQL backend which all of your cluster nodes are accessing is maxed out, no amount of additional machines in the load balancing cluster will improve performance. The SQL backend is your weakest link and the only way to wring better performance out of it is to upgrade hardware or start splitting databases into separate servers.
Pulling the plug

As mentioned earlier redundancy is one of the goals of a load balanced installation and to test this out I decided to test a failure scenario by pulling the network cable out of one of my servers. With both cluster nodes running one of the clusters went dead and after 10 seconds all requests ended up going to the still active cluster providing the anticipated redundancy. A few requests on the client ended up failing – basically those that had made it into the servers request queue. All others are silently moved over to the other server in the pool.

In another test I decided to turn off the Web service, which resulted expectedly in the network connection still being fed requests that now started to fail. This is to be expected because NLB deals at the network protocol level but doesn’t check for failure of the requests at the network application level (Web Server). For this scenario you will need a smart monitoring application that can tell that your Web services are not responding on port 80 or even better not returning the results that you should be getting back.

The bottom line here is: The service works well for catching fatal failures such as hardware crashes or network failures that cause the network connection to a single machine to die. But application level failures continue to be your responsibility to monitor and respond to.

Just add water… eh, machines

The Windows Server Network Load Balancing service finally makes load balancing affordable and relatively easy to implement. It’s taken a while to get here from two Windows versions back, but now that the tools are integrated into Windows it’s relatively painless to scale out to other machines. It’s good to know that the capabilities are built-in and that you can tackle applications that may require more than a single machine.

Just remember to plan ahead. Just like anything the process of taking an application and making it do something new, spreading apps over multiple machine takes time and some planning to get right. Don’t wait until you really, really can’t live without this feature – start planning for it before you do. Finally make sure you know your bottlenecks in your Web applications. A load balancing cluster is only as good as its weakest link. Pay special attention to data access as that is likely to be the most critical non-cluster component that can potentially snag scalability.

But isn’t that a position we all wish we were in? So much traffic we can’t handle it? Well, hopefully you’ll get to try out this scenario for real – real soon, so you (or your boss) can retire rich…

As always if you have any questions or comments about this article please post a message on our message board at: http://www.west-wind.com/wwThreads/Default.asp?Forum=Code+Magazine.
odin Ofline   Alıntı ile Cevapla
Alt 23-01-2007, 14:58   #7
B J K
 
odin - ait Kullanıcı Resmi (Avatar)
 

Windows Sunucularla Ağ Yükü Dengeleme
Ağ Yük Dengelemesi (Network Load Balancing - NLB) üyeler arasında IP trafiğini bölüştürerek, her üyesine tek başlarına bulundukları durumdan daha az ağ yükü binmesini sağlayan bir teknolojidir. Büyük ağ yapılarında Web sunucularının performansı düştüğünde, "proxy" sunucusu isteklere yeterince hızlı cevap veremediğinde, terminal servisi sunucusu istemci yoğunluğundan yavaşlamaya başladığında NLB yapma gereği doğar. NLB birkaç sunucuyu bir araya getirip bunlardan bir NLB kümesi (cluster) oluşturur. Küme, ortak uygulamaları birlikte çalıştırıp, uygulamaya ya da istemciye tek bir sistem imajı üreten bilgisayar grubudur. Bilgisayarlar birbirine donanımsal ve yazılımsal olarak bağlıdır. Bu bağlantılar bilgisayarlara hata toleransı ve ağ yük paylaşımı olanağı sağlar.

Yük dengeleme çözümleri 4 ana kategoride toplanır;

Round Robin DNS: DNS tabanlı bu çözüm kısıtlı ve statik bir yük dağılımı sağlar. Örneğin, itu.edu.tr etki alanı altında bulunan 'www' kaydı için DNS'de aşağıdaki gibi 3 farklı A kaydı oluşturulmuş olsun:

www 160.75.2.10 www 160.75.2.11 www 160.75.2.12

DNS sunucu kendisine www.itu.edu.tr ismini çözmek için yollanan sorgulardan ilkine cevap olarak sırasıyla 160.75.2.10, 160.75.2.11 ve 160.75.2.12 ‘yi yollar ve bu cevabı alan istemci ilk olarak 160.75.2.10 IP adresine bağlanır. Bir sonraki sorgu için DNS sunucu 160.75.2.11, 160.75.2.12 ve 160.75.2.10 cevabını yollar ve bu cevabı alan istemci ilk olarak 192.168.1.11 IP adresine sahip Web sunucusuna bağlanmaya çalışır. Bu yapı her ne kadar Web sunucuları arasında yük dağılımını sağlayan bir yapı olarak görülse bile aslında tam manasıyla Web sunucuları arasında bir yük dağılımı sağlamaz; çünkü 192.168.1.10 IP adresine bağlanan bir istemcinin bu Web sunucusuna yollayacağı istek sayısı ile 192.168.1.11 IP adresine sahip Web sunucusuna bağlanan istemcinin bu Web sunucusuna yollayacağı istek sayısı birbirinden farklı olabilir. Ayrıca DNS’e girilen ve istemcilere cevap olarak yollanan IP adreslerinden herhangi birisine sahip bir Web sunucusunun hizmet veremediği bir durumunda kendisine cevap olarak dönen listedeki sıralamanın başında çöken Web sunucusunun IP adresinin bulunduğu bir istemci belirli bir süre hizmet alamayacaktır. İstemcilerin hizmet veremeyen bir Web Server’a bağlantı isteği yollamalarını önlemek için DNS’teki bu A kaydını silmek gerekecektir. Bu durum da "Round Robin DNS" yapısının statik olduğunu gösterir.

Hardware-Based Load Balancing (Donanım Bazlı Ağ Yükü Dengeleme): Belli donanımlar kullanılarak gerçekleştirilen çözümdür. Bu yapıda kümenin IP adresi donanıma atanır ve donanım kendisine gelen istekleri tipik bir NAT (Network Adress Translation - Ağ Adres Çevrimi) işleminden geçirerek kendisine bağlı sunuculara kendi üzerinde tanımlı kurallar çerçevesinde iletir.

Dispatcher Software Load Balancing (Yazılım Bazlı Ağ Yükü Dengeleme): Bu yapı, yukarıda anlatılan "Hardware-Based Load Balancing" ile çok benzerdir. Tek farkı yük dağılımı için bir donanım değil de bir yazılım kullanılmasıdır. Bu yapıda yük dağılım işleminin performansı, yazılımın çalıştığı bilgisayarın performansıyla doğru orantılıdır.

Network Load Balancing (Ağ Yükü Dengeleme): Yazılım temelli bu çözüm herhangi bir donanıma ya da üçüncü parti bir yazılıma ihtiyaç duymadan çalıştırılabilir. Bu dökümanda bu yapı üzerinde durulacaktır.
Ağ Yükü Dengeleme (Network Load Balancing - NLB); Windows 2000 ve 2003 Server ailesi işletim sistemlerinin bir parçası olarak Microsoft’un sağladığı bir teknolojidir.
Windows Server ailesindeki Network Load Balancing servisini kullanarak kümeleme (clustering) sayesinde herhangi bir ağdaki Web sunucusu, FTP sunucusu, firewall sunucusu, proxy sunucusu, VPN sunucusu, media sunucusu, terminal sunucusu gibi sunucuların istemcilere kesintisiz ve kabul edilebilir bir kalitede hizmet vermesini sağlanabilir.


NLB özelliğini destekleyen Windows Server versiyonları:

• Windows 2000 Advanced Server
• Windows 2000 Datacenter Server
• Windows Server 2003 Web Edition
• Windows Server 2003 Server Edition
• Windows Server 2003 Enterprise Edition
• Windows Server 2003 Datacenter Edition
Temel olarak, NLB açıldığında, NLB sürücüsü NIC sürücüsü ile IP protokolü arasına yerleşir ve tüm NLB kümesi üyelerine gelen her paketi alıp inceler. Paket kablodan kümeye geldiğinde her nod paketi alır, inceler ve küme çapında belirtilmiş kurallara göre paketi üst katmanda bulunan IP protokolüne iletir veya paket daha NLB sürücüsündeyken dışarı atılır. Böylece trafik nodlar arasında paylaştırılır. Kısaca tüm nodlar kümeye gelen trafiği alır; ama bazıları cevap verir.

NLB kümeleri iki farklı modda çalışabilir. Birincisi, aynı zamanda varsayılan mod olan "unicast mod"’dur. "Unicast mod"'da kümeyi oluşturan nodlarca kullanılan bir tek sanal MAC adresi vardır. Bu adres daima 02-BF ile başlar. Tüm küme üyelerinin bu tek adresi kullanması, onların bu adresi kullanan (NLB sürücüsü çalışan) ağ kartı üzerinden görüşebilmelerini engeller. Örneğin; nod A, nod B’ye bir paket gönderirken hedef ve kaynak MAC adreslerini aynı yazar. Bu paketi alan nod B kaynak MAC adresi ile paketin hedefi olan kendi MAC adresini karşılaştırınca bunların aynı olduğunu görüp bir hata oluştuğunu düşünerek paketi atar. Sonuç olarak "unicast mod" çalışan bir NLB kümesi üyeleri NLB çalıştıran ağ kartı üzerinden birbirleriyle görüşemezler. Bu sorunu ortadan kaldırmak için iki yöntem vardır. Birincisi nodlara ikinci bir ağ kartı takmaktır. İkinci ağ kartı, NLB kümesi ile aynı ağa veya farklı ağa bağlı olabilir. Nodlar arasında ilave bir bağlantı sağlaması yeterlidir. İkinci çözüm ise ikinci NLB küme modu olan "multicast mod"'u kullanmaktır. "Multicast mod"'da NLB küme üyeleri hem sanal MAC adresini hem de kendi MAC adreslerini kullanırlar. Bu modda paylaşılan MAC adresi (sanal MAC) daima 03-BF ile başlar. Üyeler bu modda NLB kurulu ve çalışan ağ kartı üzerinden birbirleri ile görüşebilirler. Bu küme üyelerinde tek ağ kartı olduğu durumlarda tavsiye edilen küme modudur.

NLB küme üyelerinin birbirleri ile sürekli haberleşmek zorundadır. Yakınsama (Convergence), NLB küme durumunun belirlenmesi ve yükün dağıtılması sürecidir. Kısacası NLB algoritması nod sayısı, varsa belirlenen port kuralları ve küme IP’lerini göz önüne alarak bir hesap yapar, bu hesap sonucuna göre üyelerin küme IP’sine gelen trafiği kabul ya da reddetmesini sağlar.

NLB küme üyeleri için yakınsama süresi 3 saniyedir. Yani bir NLB küme üyeleri devre dışı kaldığında, diğer üyelerin bunu farkettikten sonra tekrar yük dağılımını düzenlemesi 3 saniye sürer. Örneğin, üç üyeli bir NLB kümesine gelen trafik 33% olarak paylaştırılırken, bir nod devre dışı kalınca 3 saniyede yakınsanmış olur ve trafiği 50% olarak paylaştırmaya başlar.

NLB ile ilgili diğer bir kavram “Heartbeat”dir. "Heartbeat" bir NLB üyesinin diğer üyelere devrede olduğunu söyleme sistemidir. Bu sayede birbirlerinin durumundan haberdar olurlar. NLB kümesine bir nod eklenince, bir nod devre dışı kalınca veya bir nod yeniden devreye girince bunu tesbit etmelerini sağlayan Heartbeat paketleridir. Heartbeat NLB çalışır durumdaki ağ kartı üzerinden yapılan bir broadcast'tir. Heartbeat NLB üyesinin üzerinde bulunan ilave ağ kartlarından yapılmaz. Her NLB küme üyesi 1,5 KB l'ik bu heartbeat mesajlarını saniyede bir kere gönderir. Bu gönderilme aralığı kayıt defterinden (registry) değiştirilebilir; fakat bu ayar tüm üyelerde aynı olmalıdır.

Varsayılan olarak bir nod arka arkaya 5 heartbeat kaçırırsa diğer NLB küme üyeleri o n**** kümeden düştüğüne karar verirler. Böylece yeni üye sayısı ile birlikte NLB algoritması yeniden çalışır, yakınsama başlar. Ne kadar heartbeat mesajı kaçtıktan sonra o nod devre dışı kabul edileceği de kayıt defterinde modifiye edilebilir (bu ayar da tüm üyelerde aynı olmalıdır).
Sonuç olarak, yeni bir nod eklenirse bunun tesbit edilip yükün tekrar dağıtılması 3 saniye sürer. Bir nod devre dışı kalırsa bunun diğer nodlarca farkedilmesi ve "convergence"’a başlanması için 5 saniye gereklidir (yani arka arkaya 5 heartbeat kaçırma). Convergence 3 saniye süreceği için yükün tekrar paylaştırılması toplam 8 saniye sürecektir.
NLB ile ilgili bir diğer önemli kavram ise "affinity" (eğilim) 'dir. Eğilim, NLB nin nasıl çalışacağıdır yani bir üye NLB kümesine gelen IP paketlerini kabul edilip edilmeyeceğini belirler. None, Single ve Class C olmak üzere 3 tip eğilim vardır. Affinity, None olarak ayarlanmışsa gelen paketler kaynak port ve kaynak IP bazında işlenir. Örneğin, Web sunucusu NLB kümesi oluşturmak isteniyorsa seçilecek olan eğilim bu olmalıdır. Böylece küme sanal IP adresine gelen trafik tüm üyelerce eşit şekilde paylaşılır. Bir istemci, örneğin bir Web sunucusu, NLB kümesinin sanal IP adresine geldiğinde küme üyelerinden biri tarafından kabul edilir. İstemci tekrar bağlandığında rasgele başka bir üye tarafından kabul edilir ve bağlantı kurulur.
Single Affinity ise kaynak IP adresine göre NLB kümesine gelen trafiği dağıtır. Örneğin, bir istemci iki terminal sunucudan oluşan bir NLB kümesinde sanal IP adresini yazarak bir terminal bağlantısı kurup, küme üyelerinden nod A tarafından kabul edildiğinde bu sunucu üzerinde kendisine ait oturumla çalışırken bağlantı kesilirse ve istemci tekrar bağlantı kurmak için NLB kümesine giderse NLB istemciyi belki nod B'ye yönlendirir. Bu durumda nod A'da bekleyen oturumuna (açık olan dokümanlar, programlar, vs.) ulaşamaz. Dolayısıyla istemcinin tekrar nod A'ya bağlanması için kullanılması gereken affinity Single’dır.
Son eğilim tipi olan Class C Affinity ise aslında Single Affinity benzeri bir NLB yöntemidir. Single Affinity'ye göre daha az kısıtlayıcıdır. Kısaca aynı C sınıfı aly ağdan gelen kullanıcılar hep aynı küme üyesi tarafından karşılanır. Fazla kullanışlı görünmemesine rağmen özellikler Proxy sunucuların yük paylaşımı için kullanılabilir.
Ağda yük paylaşımı yönetimi için temel olarak Network Load Balancing Manager snap-in’i kullanılır. Bununla birlikte ağ kartı özellikleri penceresinden de NLB ayarları yapılabilir. Yalnız NLB ayarları yapılırken Network Load Balancing Manager snap-in ve ağ kartı özelliklerinin birlikte kullanılması bazı tutarsız sonuçlara yol açabilir. Bunun dışında komut satırından NLB konfigürasyonu yapmak için wlbs ve nlb gibi araçlar da mevcuttur.

Ağ Yük Dengeleme ayarları üç temel bölümden oluşur;
Cluster Parameters (Küme Parametreleri)
Host Parameters (Sunucu Parametreleri)
Port Rules (Port Kuralları)

Bu ayarlardan Küme Parametreleri tüm NLB kümesi üyelerinde aynı olmalıdır. Cluster IP configuration kısmında NLB kümesine atanacak sanal IP adresi bunu alt ağ maskesi ile kümenin FQDN’i ve kümenin sanal MAC adresi ayarları bulunur.

Küme Operation Mod kısmında da küme çalışma mod’u ayarlanabilir. "Remote control" kısmında ise NLB kümesinin uzaktan yönetimine izin verilebilir ve bu uzaktan yönetim için şifre belirlenebilir.
Host Parameters sekmesinde küme üyelerinin herbiri için spesifik olan ayarlar yapılabilir. İlk değişken olan Priority 1-32 arası değerler alır ve Priority değeri 1 olan NLB kümesi üyesine "Default Host" denir. NLB kümesine bir "Port Rule" tarafından belirlenmemiş bir trafik ulaşırsa bunun kimin tarafından işleneceğini belirleyen bir değerdir. Aslında varsayılan olarak tüm portları kapsayan bir kural olduğu için Priority’nin değeri bu Port Rule silinmeden bir anlam taşımaz. Dedicated IP kısmında sadece o küme üyesine ait olacak ve ona ulaşılırken kullanılabilecek bir IP adresi belirtilebilir.

Host Parameters kısmındaki bir diğer ayar olan Initial Host State ise küme üyesi olan makina tekrar başladıktan sonra NLB servisinin durumunun ne olacağını belirtir. Varsayılan değer olan “Started” makina açıldığına NLB servisinin tekrar çalışmasını ve bu üyenin tekrar NLB kümesine dahil olmasını sağlar.

NLB ayarları içinde belki de en önemlisi olan "Port Rule", port kurallarının yapıldığı bölümdür. Daha önce bahsedilen "affinity" ayarlarının yapıldığı yer de burasıdır.
"Port Rule", tüm port ve protokolleri içeren, bu trafik için "Single Affinity" uygulayan ve bunu da eşit bir şekilde tüm küme üyelerine dağıtan bir kuraldır. Kural içeriğini görmek için kural seçiliyken "Düzenle" seçmek yeterlidir.
Buradaki ayarlardan ilki olan Küme "IP address", NLB kümesinin hangi IP'leri için kuralın geçerli olacağını belirler. Bunun altındaki "Port Range" kuralın hangi portları içeren bir kural olacağını ayarlar. "Protocols" ise hangi protokollerle gelen trafiğin NLB sürecine dahil edileceğini ayarlar.
"Filtering Mod" kısaca yük dengeleme trafiğinin birkaç üye arasında dağıtılıp dağıtılmayacağını ve bu dağılımın (Affinity) nasıl yapılacağını belirler. Üç Affinity tipi de burada görülmektedir. Yük üyeler arasında eşit dağıtılabileceği gibi oranlı bir şekilde de dağıtılabilir. Bunu için Equal seçeneği kaldırılmalı ve üyeler arasında toplam 100 olacak şekilde istenilen değerler verilmelidir. Filtering Mod kısmındaki bir diğer seçenek olan, "Single Host" ise kümeye gelen trafiği tek bir küme üyesinin karşılaması prensibiyle çalışır. Burada ayırıcı olan kriter Handling Priority’dir. Handling Priority değeri düşük olan NLB kümesi üyesi bu kural tarafından belirtilen trafiğin tek hedefidir. Bu üye devredışı kalırsa trafik bir diğer üyeye yönlendirilir.
Son ayar olan "Disable This Port Range" ise aslında TCP/IP filtering’den farksızdır. Kısaca kural tarafından belirlenen portları kapatır.
Özetle, Ağda Yük Paylaşımı sadece TCP ve UDP trafiğini desteklemez. GRE trafiği için de yük dengelemesi yapabilir. Bununla birlikte 2003 NLB servisi VPN bağlantısı için PPTP ile birlikte IPsec protokollerini de destekler. Yalnız kümeye yeni üye eklenmesi durumunda bazı istemci bağlantıları kesilebilir (Bu sorun XP SP1 ve 2003 için giderilmiştir). Son olarak, NLB ve Microsoft Server Clustering Services aynı makinaya kurulamazlar.
odin Ofline   Alıntı ile Cevapla
Alt 23-01-2007, 21:37   #8
Banned
 
pancu38 - ait Kullanıcı Resmi (Avatar)
 

sagolasin
__________________
Hayat ne kadar uzun ama sana olan aşk o kadar sonsuz çünkü biz hakiki beşiktaş lıyıız......

pancu38 Ofline   Alıntı ile Cevapla
Cevapla

Bu konuyu arkadaşlarınızla paylaşın


Konuyu Toplam 1 Üye okuyor. (0 Kayıtlı üye ve 1 Misafir)
 

Yetkileriniz
You may not post new threads
You may not post replies
You may not post attachments
You may not edit your posts

BB code is Açık
Smileler Açık
[IMG] Kodları Açık
HTML-KodlarıKapalı
Trackbacks are Açık
Pingbacks are Açık
Refbacks are Açık


Türkiye`de Saat: 14:59 .

Powered by vBulletin® Copyright ©2000 - 2008, Jelsoft Enterprises Ltd.
SEO by vBSEO 3.3.2

Sitemiz CSS Standartlarına uygundur. Sitemiz XHTML Standartlarına uygundur

Oracle DBA | Kadife | Oracle Danışmanlık


1 2 3 4 5 6 7 8 9 10 11 12 13 14 15 16 17 18 19 20 21 22 23 24 25 26 27 28 29 30 31 32 33 34 35 36 37 38 39 40 41 42 43 44 45 46 47 48 49 50 51 52 53 54 55 56 57 58 59 60 61 62 63 64 65 66 67 68 69 70 71 72 73 74 75 76 77 78 79 80 81 82 83 84 85 86 87 88 89 90 91 92 93 94 95 96 97 98 99 100 101 102 103 104 105 106 107 108 109 110 111 112 113 114 115 116 117 118 119 120 121 122 123 124 125 126 127 128 129 130 131 132 133 134 135 136 137 138 139 140 141 142 143 144 145 146 147 148 149 150 151 152 153 154 155 156 157 158 159 160 161 162 163 164 165 166 167 168 169 170 171 172 173 174 175 176 177 178 179 180 181 182 183 184 185 186 187 188 189 190 191 192 193 194 195 196 197 198 199 200 201 202 203 204 205 206 207 208 209 210 211 212 213 214 215 216 217 218 219 220 221 222 223 224 225 226 227 228 229 230 231 232 233 234 235 236 237 238 239 240 241 242 243 244 245 246 247 248 249 250 251 252 253 254 255 256 257 258 259 260 261 262 263 264 265 266 267 268 269 270 271 272 273 274 275 276 277 278 279 280 281 282 283 284 285 286 287 288 289 290 291 292 293 294 295 296 297 298 299 300 301 302 303 304 305 306 307 308 309 310 311 312 313 314 315 316 317 318 319 320 321 322 323 324 325 326 327 328 329 330 331 332 333 334 335 336 337 338 339 340 341 342 343 344 345 346 347 348 349 350 351 352 353 354 355 356 357 358 359 360 361 362 363 364 365 366 367 368 369 370 371 372 373 374 375 376 377 378 379 380 381 382 383 384 385 386 387 388 389 390 391 392 393 394 395 396 397 398 399 400 401 402 403 404 405 406 407 408 409 410 411 412 413 414 415 416 417 418 419 420 421 422 423 424 425 426 427 428 429 430 431 432 433 434 435 436 437 438 439 440 441 442 443 444 445 446 447 448 449 450 451 452 453 454 455 456 457 458 459 460 461 462 463 464 465 466 467 468 469 470 471 472 473 474 475 476 477 478 479 480 481 482 483 484 485 486 487 488 489 490 491 492 493 494 495 496 497 498 499 500 501 502 503 504 505 506 507 508 509 510 511 512 513 514 515 516 517 518 519 520 521 522 523 524 525 526 527 528 529 530 531 532 533 534 535 536 537 538 539 540 541 542 543 544 545 546 547 548 549 550 551 552 553 554 555 556 557 558 559 560 561 562 563 564 565 566 567 568 569 570 571 572 573 574 575 576 577 578 579 580